Week 3: The Concept of Modularity
- Stevie Tewfik
- May 3
- 4 min read

Updated: May 6
Whilst last week I discussed how I was focusing on my different segments connecting seamlessly together geometrically, it's a whole other topic when you begin to think about materials and textures. So naturally this week was all about how my tiling textures can help continue this idea of "seamlessness".
I began by reading through and watching some of the substance designer murals on the Learning Space. As of last week, I had no ideas what substance designer was as a software itself. The ability to eb able to create completely tileable materials all with just node graphs was bewildering to me, so I had to try it out.
Before I was able to do this however, I had to bring my blockout from Maya, into Unreal Engine using the "game exporter" as mentioned in the Mural on the Learning Space.
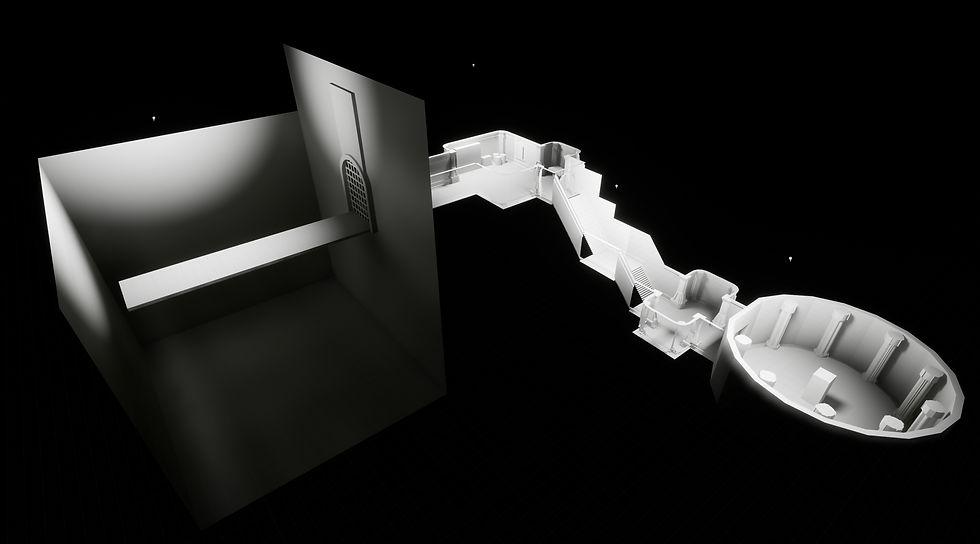
After having successfully imported my scene, I lit it very basically to see how it looked clean. I was satisfied with the general setup, so began experimenting with Substance Designer.
My first attempt was following a tutorial for a brick pattern that I found on Youtube. The tutorial was quite decent, as it introduced me into exposing custom parameters within Designer..
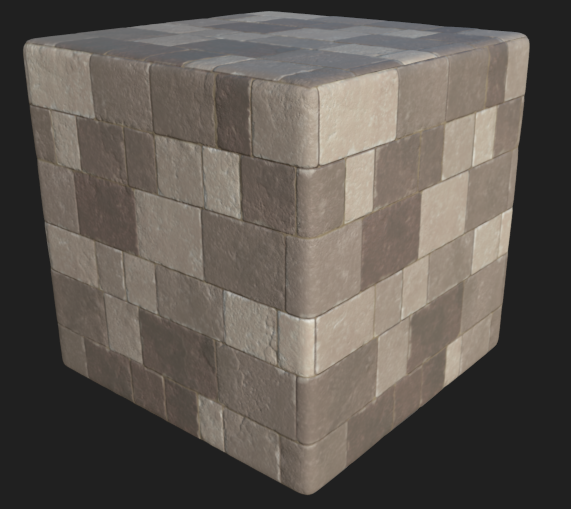
Whilst it is quite a basic and easily recognisable as repeating, I am still happy with how it turned out and, from a glance, the graph looks impressive. The tutorial also introduced me to adding comments and framing different sections of my graph, to more easily allow me to see the wood for the trees if I ever come back to it. Below, I have sorted the nodes into a "normal_heightmap" section and an "albedo" area.

This is a list of all the editable parameters of this material. all which can (in real time) edit the colour, size, damage, roughness and other properties of the tiles and interstice between said tiles. This allows for quite a lot of customisation and variation of "material instances" in the future from within Unreal.
I believe there is a way to create similar parameters from within Unreal itself, but that is something that I will look into when creating instanced props in the future.

This is a preview of how I am able to change each aspect of the material on the fly, this means that I can use this material in future projects without it looking exactly the same. The colours and colour variation are completely changeable too.
As happy as I was with this material, I used this as more of a test of how materials are made and controlled, and I don't think tiles as uniform and "perfect" as this will fit with my dungeon that well, so I turned to a new tutorial, for more of a cobble effect..

This was my next material, for which I roughly followed a tutorial for, again via Youtube. This one took a great deal longer to create, as there were many more aspects that went into creating all the different "layers".

I am very happy with how this looks, so much so that I am going to use it as the primary tiling material for my dungeon floors. However, it still looks too clean to me, so I want to try and find a way (maybe using decals) to add a lot of moss over the top, but in a way that it doesn't seem obviously tiling.
As seen here, the graph is considerably more complex than my first material, but I have once again tried to organise it into different sections, each relating to one of the editable properties of the material.

This is how it looks in-engine with a tiling factor of 2. I created a basic material setup for it, and added some "Coordinate UV" nodes plugged into each of the maps, and converted them to scalar parameters, which allows me to change the tiling at any time through something new I found called a "Material Instance".

The box on the far left is the "UV Tiling" section, which contains the 2 scalar parameters for the U and V axis of each map. However, it's clear that there is something different about this material, as if there are duplicates of each map and quite a few extra nodes than necessary. This was because I went and did some digging online, and discovered how to do "vertex painting", with most of my help coming from a Mural created by Unreal Expert - William Pryn, which he kindly gave me early (as it is a 2nd year resource).

Vertex painting allows me (for this material) to combine different materials, using the cobblestone's height map as a mask for the secondary material to blend via. I found a simple moss material on the Substance 3D Community Assets page, and expanded upon it in Painter. After having exported the maps, I converted it into a smart material that I might use for assets in the future.
This shows me vertex painting my moss onto my cobblestone, and that you can vertex paint different planes at the same time, allowing for a completely new variation of moss spread for each tile that is painted. I did this across every floor tile in my scene, which lay down a good grounding point for the look of the rest of the level.

I am happy with the independent technical exploration I carried out this week, so during reading week I want to begin early research into trim sheets, model, sculpt and texture one that will be used for the modular segments I created last week.
Bibliography/ External Reading:
_______________
Pryn, William. “Blocking out in Maya & Unreal 25/26.” Mural.co, 2026, app.mural.co/t/gamesacademy5502/m/gamesacademy5502/1737379930082/c68e5a217dacd936f556aa0e019f05cecaf7f36c.
Pryn, William . “UE5 - Custom Blend Materials & Vertex Painting.” Mural.co, 2026, app.mural.co/t/gamesacademy5502/m/learningdesign2109/1657658908609/749ea47368b46a8770de65723ba057553dcbba7e.
hbitproject. “Stone Tiles - Substance Designer Tutorial for Beginners.” YouTube, 7 Oct. 2022, www.youtube.com/watch?v=hZK2MHC2mQw.
Get Learnt w/ Chunck. “00 Overview | Cobblestone Series.” YouTube, 16 Sept. 2020, www.youtube.com/watch?v=ungOHQn3qpA.
Demes, Lennart. “Moss Substance 001 Substance Material on Substance 3D Community Assets.” Adobe.com, 2026, substance3d.adobe.com/community-assets/assets/8de634d18ee49e04ed9e9e8ad14744cf8e17af6a.


Comments