Week 9: Materials
- Stevie Tewfik
- May 6
- 3 min read

Updated: May 6
I've had some fun this week looking into how I can use more material attributes to enhance and create assets. The first of which, which is something that I've been meaning to look into for a while, opacity masks.
Nearer the start of this project, I found an Abe Leal video which taught me how to use opacity masks to help make geometry look more complex than it is. I came back to this, though earlier this week, applied this to an area of my level which may fly under the radar for most people that look at it.

My window segments make good use of this technique, as they are just a plane with the opacity bake into the mesh. It's properly transparent as you can see below when I'm moving the torch behind. By the end of the project, I want "god rays" to be shining through these windows, with shadows of the window "grate" being cast onto the floor of the dungeon.

The light is obscured by the parts of the texture that are opaque, so you get an accurate light wrap and bloom effect around (and not through) these parts. In Unreal, all that is required for this technique to work is a B&W mask (with the black areas aimed to be transparent) of your textures, and the blend mode set to "masked" as this opens up the opacity channel for you to plug your map into.

I also used this masking technique for some cobwebs, which are dotted round and strung between some objects in my scene.

I found an image of a cobweb online, and went into Photoshop to make some tweaks. As you can see below, I have some nodes plugged into the emissive channel. This is because I wanted to recreate the look of cobwebs that light up in some areas when light is shone on them.
I copied the original base colour map, and began rubbing out sections of it using a 50% opacity eraser, and plugged it into the emissive slot. This now gives the effect that some areas of the web are thicker (and therefore brighter) than others.

I then thought, cobwebs have an elasticity to them, and they would gently blow in the draft. To mimic this effect, I was introduced to a new concept called SimpleGrassWind, which uses an objects WPO (world position offset) to bend, twist and transform its material in a way that looks like wind blowing through that object.

I exposed each of the values that are required for this node to work as custom, scalar parameters, meaning that when I instance the material, I can edit these on the fly. As you can see below, they can imitate the intensity of how often the wind blows, and how "heavy" each gust is.

Upon discovering the subtle yet intriguing feature, I had to find more excuses to it on, and what else better than vines. However, I didn't know how to make them, especially with any degree of realism. Welcome back, Jeremy West. He sent me a mural that he had created "once again for 2nd year) explaining how to make vines using Substance Sampler, Tree-it and Maya.

I bought Tree-it (which was definitely worth the £3.40 on Steam) to make the base branches. I scanned in a few leaves I found outside of my flat, and imported them into Sampler, which generated perfect maps for each leaf.
I then projected these leaves (once again using opacity masks) onto some planes and (using the MASH functions inside of Maya) scattered them at random along a curve aligned with the "branch" I had made.

I then exported this as an FBX, and imported it into Unreal. From there, I was able to drag and drop it into the foliage brush (exactly like the rubble) and was able to scatter them along the wooden beams of my modular wall segments.
As good as they look here, I realised they seemed a bit dark, as I hadn't introduced the aspect of SSS (subsurface scattering). This is the concept that light can pass through certain objects, like how leaves turn a lighter shade when light is shining on them, when they aren't completely opaque.
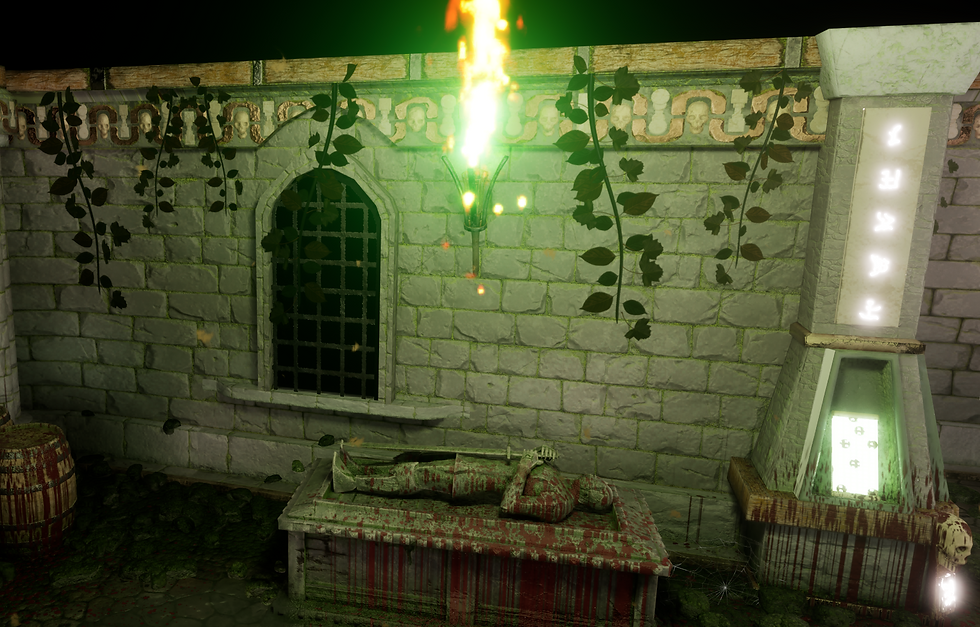
There was a very easy way to add this, simply by adding a Constant3Vector node into the subsurface colour when a material is using the "Two Sided Foliage" shading model.

After you set this, whenever light is shone through the applied material, you get a bleed of light, which you can change depending on what colour you choose in the vector node.

The last step, as previously discussed, was to apply SimpleGrassWind to my original vine mesh, and I was done for the week!

Bibliography/ External Reading:
_______________
Abe_Leal3D. “Painting Opacity Maps in Substance Painter.” YouTube, 10 Mar. 2024, www.youtube.com/watch?v=7Iq1jUY9DJ8.
PNGTree. “Human Verification | Pngtree.” Pngtree.com, 2025, pngtree.com/freepng/black-cobweb-corner-spider-web-grunge-vector-on-transparent-background_8771843.html.
West, Jeremy . “Creating Vines in Tree It.” Mural.co, 2026, app.mural.co/t/gamesacademy5502/m/gamesacademy5502/1771335058383/45828bd88e7b6214aba1ed1a3fd01a3c8de6a5bb.


Comments